This post may contain affiliate links. Please see my full Disclosure Policy for details.
Today I’m thrilled to be hosting Kate from Life as I know it as my guest while I’m visiting family in the Bay Area. This is a craft that I might actually be able to do! 🙂 Be sure to check out her blog and show her some love in the comments 😉
Hi, I’m Kate. I am a wife to one, stay at home Mama to three and a DIY’er.
Like Nicole, I love to make the things I find on Pinterest! I mean, what is the point of looking if you don’t ever make any of those cool finds?
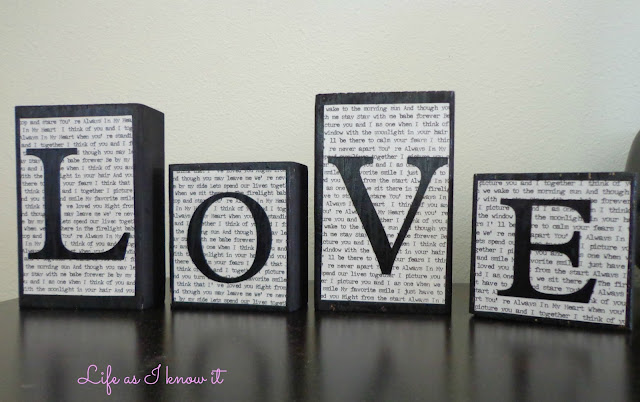
I don’t know about you, but I’m the person that goes into the store and doesn’t buy things because I’m sure I can make them myself. Sometimes it works out and sometimes it doesn’t and I end up back at the store to buy the original! But about a year ago I saw these Love blocks and knew I needed them in my house.
They are very simple to make, even if you are not crafty, and they’re cheap!
Here is what you’ll need:
-4 blocks. (I just used random 2×4 pieces that were remnants from when we finished our basement last year)
-black paint – I picked up one from Hobby Lobby. It was less than $1
-1 piece of decorative scrapbook paper.
-1 piece of black card stock. (I had the paper already, since I scrapbook)
– mod podge.
I have a Cricut that I used to cut out the letters. But if you don’t you could still free hand cut the letters out.
(I’d probably print out letters and trace them, then free hand cut them out!)
I hope you’ll give them a try! And feel free to come check out other projects I make over at Life as I know it.
- Rank Your Favorite Christmas Movies - December 10, 2025
- Hot Cocoa Spoons - September 22, 2025
- Pecan Upside Down Cake - September 16, 2025


Not so crafty? says
Super Cute! But…the instructions are rather lacking. For someone who hasn’t had much crafting experience, I don’t know what to do. If this was just to inspire ideas, great, but if it was supposed to be a tutorial, not so much. 🙁
Nicole Burkholder says
As someone who is also “not crafty” I understand! I believe with mod podge you can just spread it over whatever you want to affix to something and let it dry. The instructions would be on the bottle. This post was meant as more of an inspiration-type post rather than a tutorial (Kate was guest posting for me. Be sure to check out her site for more ideas and tutorials)
Judy Loza says
I love this I really wanna try this but with our last name. . THANKS KATE
Miss you Nicole