This post may contain affiliate links. Please see my full Disclosure Policy for details.
Today I am so excited to introduce you to Mary Kate from Christianity Cove, a fantastic resource for Sunday School lessons, homeschool resources and all sorts of cute crafts for kids (not just “churchy” ones, in case you were wondering) 🙂 After checking out these ADORABLE owl bags, head over to her site or social media pages and tell her I sent you! 
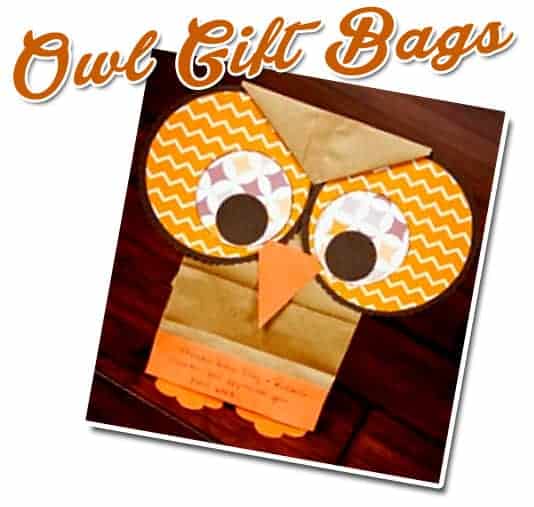
“Thank You” Owl Gift Bag
With the turning of Fall, our thoughts are filled with the things we are thankful for. One of the greatest things we can be thankful for is God’s wisdom, which in turn makes us wise when we follow him. We can tap into God’s wisdom any time that we pray. The God who created the depths of the oceans and the farthest star hears every word and is happy to answer us. He never says a question is stupid or that he doesn’t have enough time. This can make us wise as owls…
Thank someone special in your life for all the wisdom they have shared with you, by creating these super cute homemade gift bags made into an “owl” for wisdom. Fill the inside with cards sharing all the ways they have supported you! Where would we be without those people who are there to give us moral support when we need it?
Material
- Paper bag
- 3×5 cards
- Pen or pencil
- Brown, blue, and orange construction paper
- Brown-themed wrapping paper
- Cardstock, 2 pieces for each child
- Colored markers or crayons
- Scissors
- Small paper plates, 2 for each child
- Large mug
- Juice glass
- Stick glue
- Cookies or candy if desired
Instructions
- Use the small paper plate to make circles on the back of the wrapping paper to form the largest circles of the owl’s eyes. Cut out the circles.
- Use the paper plate again to make circles on the cardstock and cut out.
Note: If your children are older and more dexterous, they can hold the wrapping paper and cardstock together and cut them both at once, making a perfect match-up.
- Use the large mug to trace circles on the blue construction paper that make the middle-sized circles of the owl’s eyes. Cut out the circles.
- Use the juice glass to make the smallest circles of the owl’s eyes. Cut out the circles.
- Glue the blue circles onto the wrapping paper circles, then the brown circles onto the blue ones. Glue the eyes onto the bag to create the face of the owl. (You want to leave about 2 inches of bag above the eyes, to create the flap over “eyebrows”.)
- Cut a beak from orange construction paper and paste on the owl.
- Cut a strip of orange paper. Write on it “Thanks from [your name]. I/We appreciate all you do for me/us.” Paste it across the bottom of the bag.
- It is not necessary to make feet, but if desired, cut out the shape of feet from orange construction paper and paste them on the bottom of the bag.
- Write your personal “thank you notes” on the index cards. For example: “Thank you for your patience,” or “thank you for believing in me.”
- Place the notes inside the paper bag.
- Add candy, cookies or other gifts, if desired.
- Fold the top of the bag over as per the illustration, and your “Thank You” Owl Bag is ready to be presented to that someone special!
Mary Kate Warner
Mary-Kate is a regular blogger at Christianity Cove ( https://www.christianitycove.com/). You can often find her writing about Christian Parenting, Homeschool Teaching, Bible Study and Sunday School Activities, Faith and inspiring children to love God.
- Rank Your Favorite Christmas Movies - December 10, 2025
- Hot Cocoa Spoons - September 22, 2025
- Pecan Upside Down Cake - September 16, 2025


Pure Grace Farms says
Adorable. I can see so many uses for this cute little bag. Thanks for sharing.
Nicole Burkholder says
Isn’t it too cute? I wish I could take credit for something so crafty 🙂 Just glad Mary Kate was willing to share him with us. I think I’ll have our co-op kids make something like this for Thanksgiving this year!
Melanie says
What a cute little way to give a gift!